The Best DIY STEM Tutorials and Projects

OVERVIEW
In this project we will make a LED & Buzzer Alarm using Arduino Uno, Piezo Buzzer and some LEDs, we will set a time limit to show a sequence of LEDs turn on and the buzzer alarming sound at the end of the time limit.
You can follow this video and instructions below to make this Amazing Arduino Buzzer Alarm Project.
Video
Components Required
Here is a list of Components that we will need to make this Project.
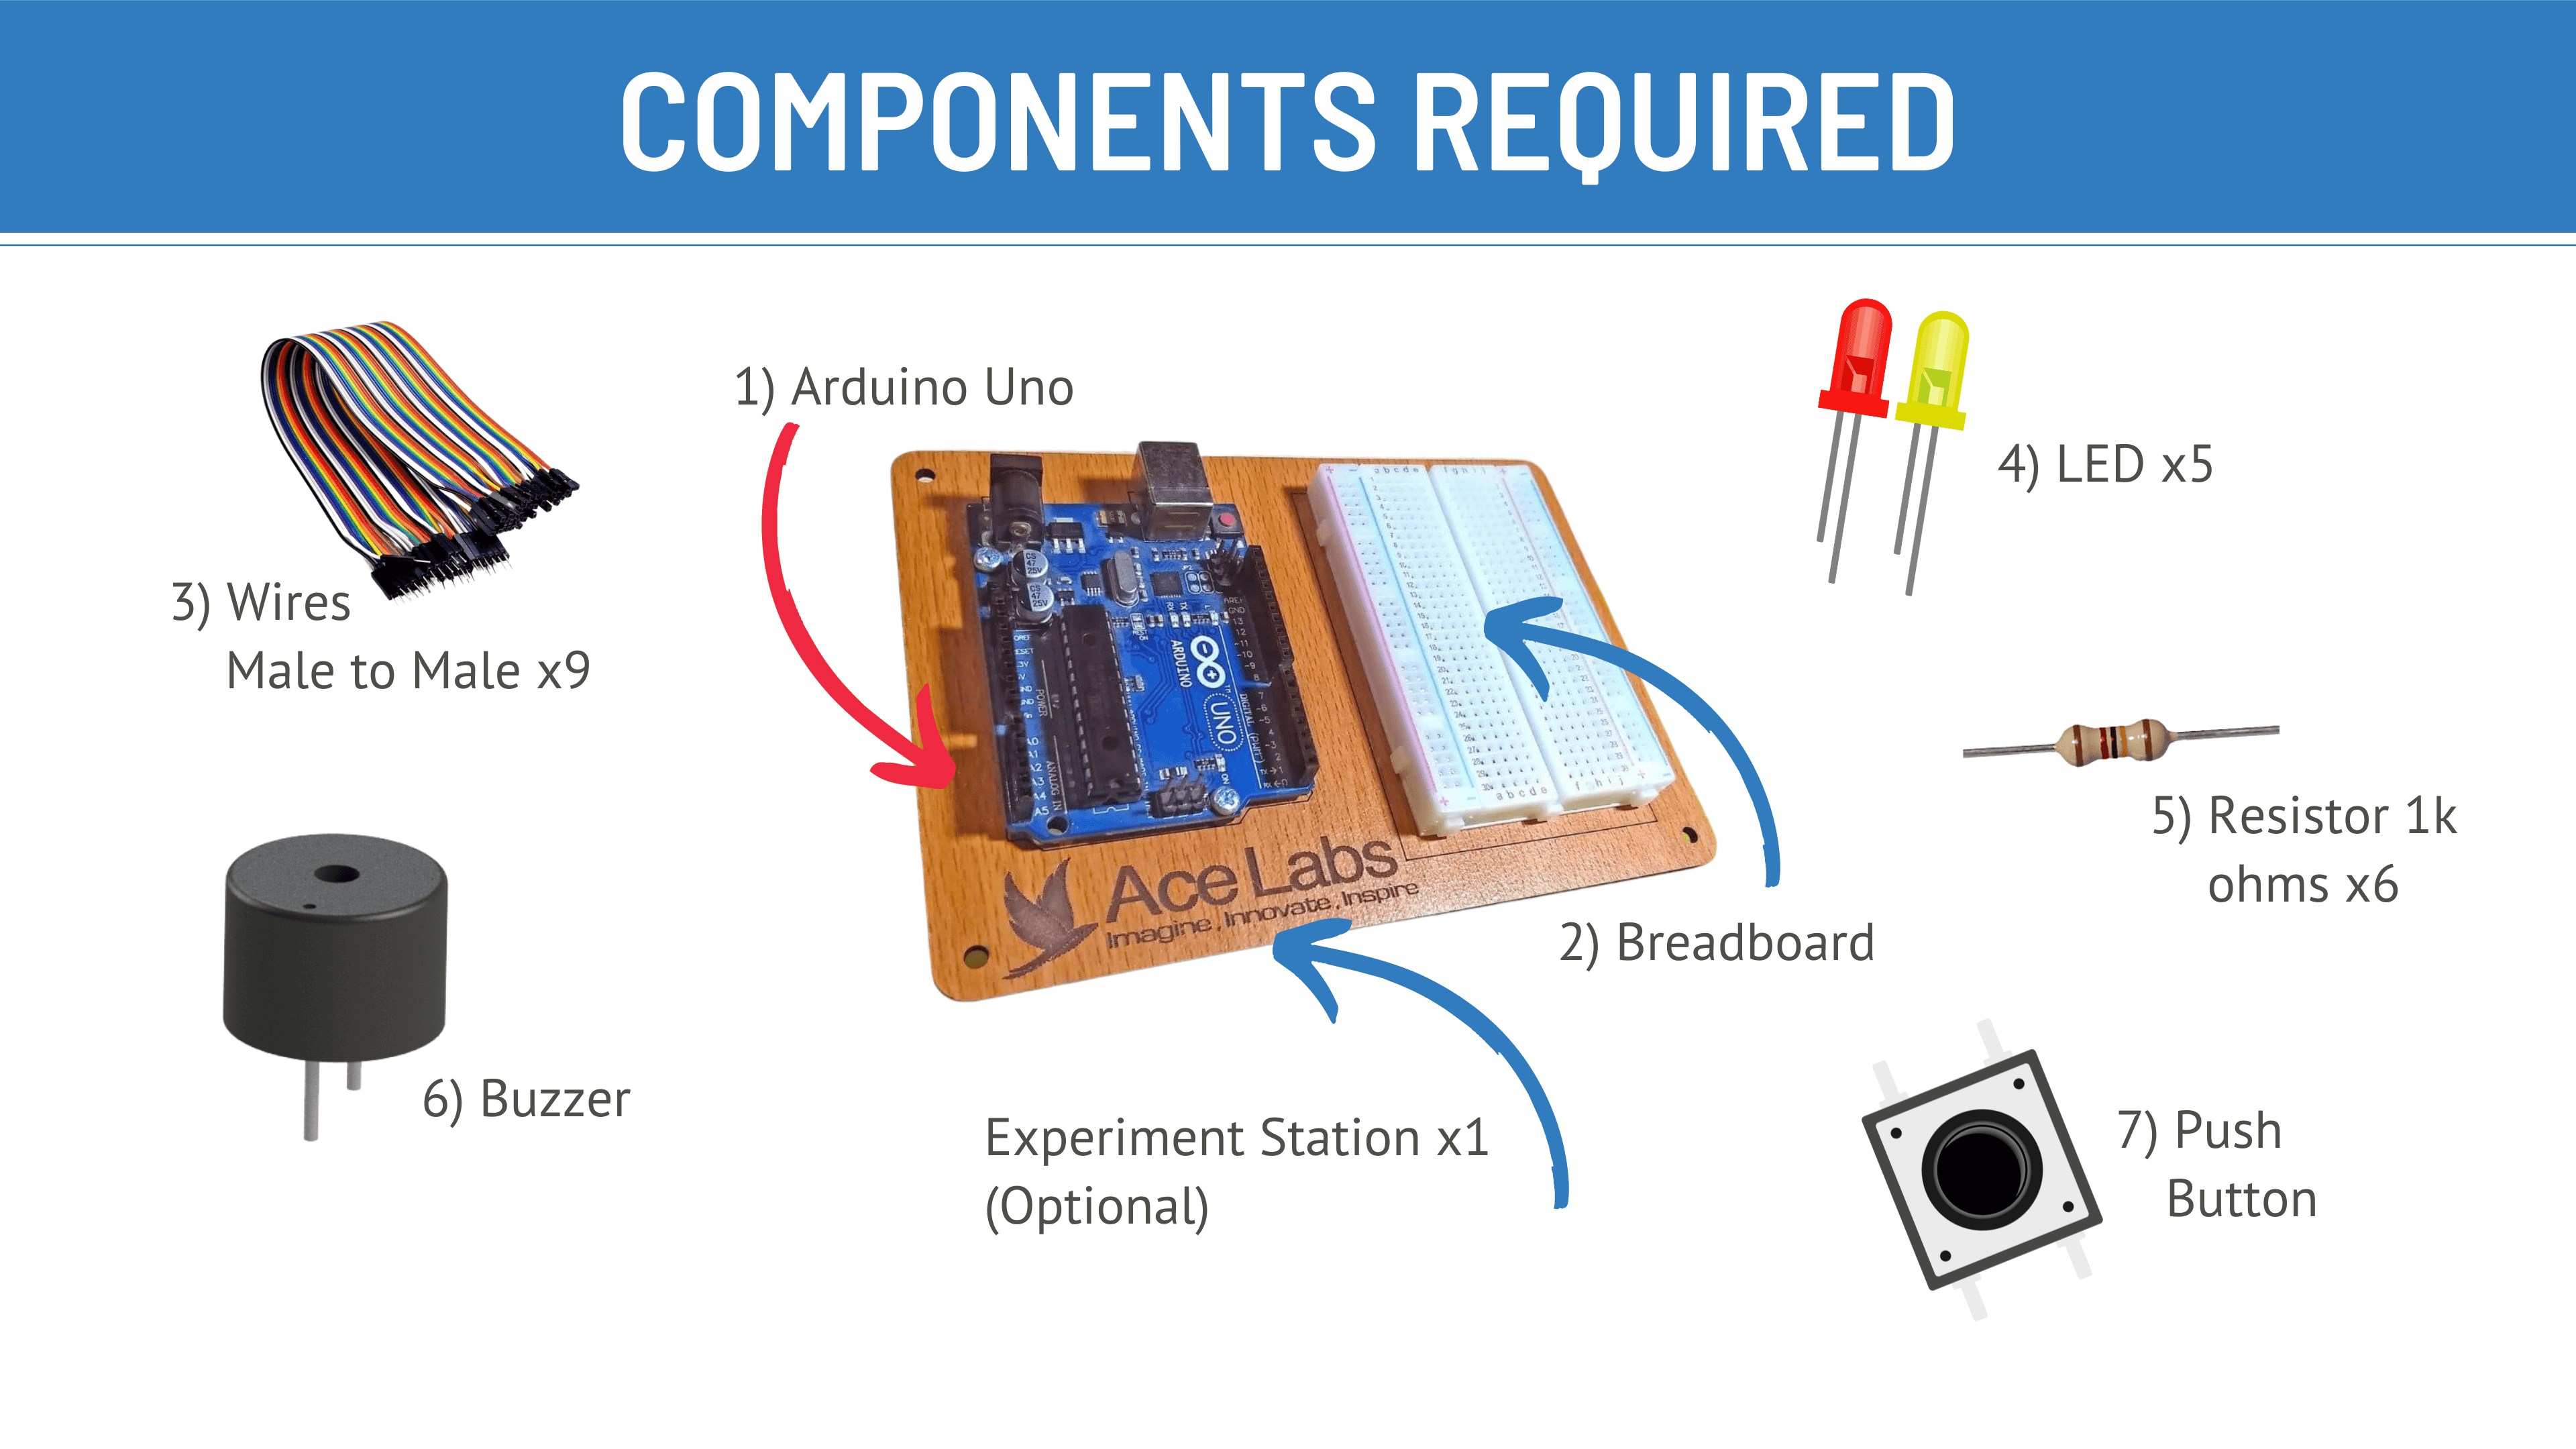
| Sr # | Item Name | Quantity |
|---|---|---|
| 1 | Arduino Uno | 1 |
| 2 | Breadboard | 1 |
| 3 | Male to Male Jumper Wires | 9 |
| 4 | LEDs | 5 |
| 5 | Resistors 1k ohms | 6 |
| 6 | Buzzer | 1 |
| 7 | Push Button | 1 |
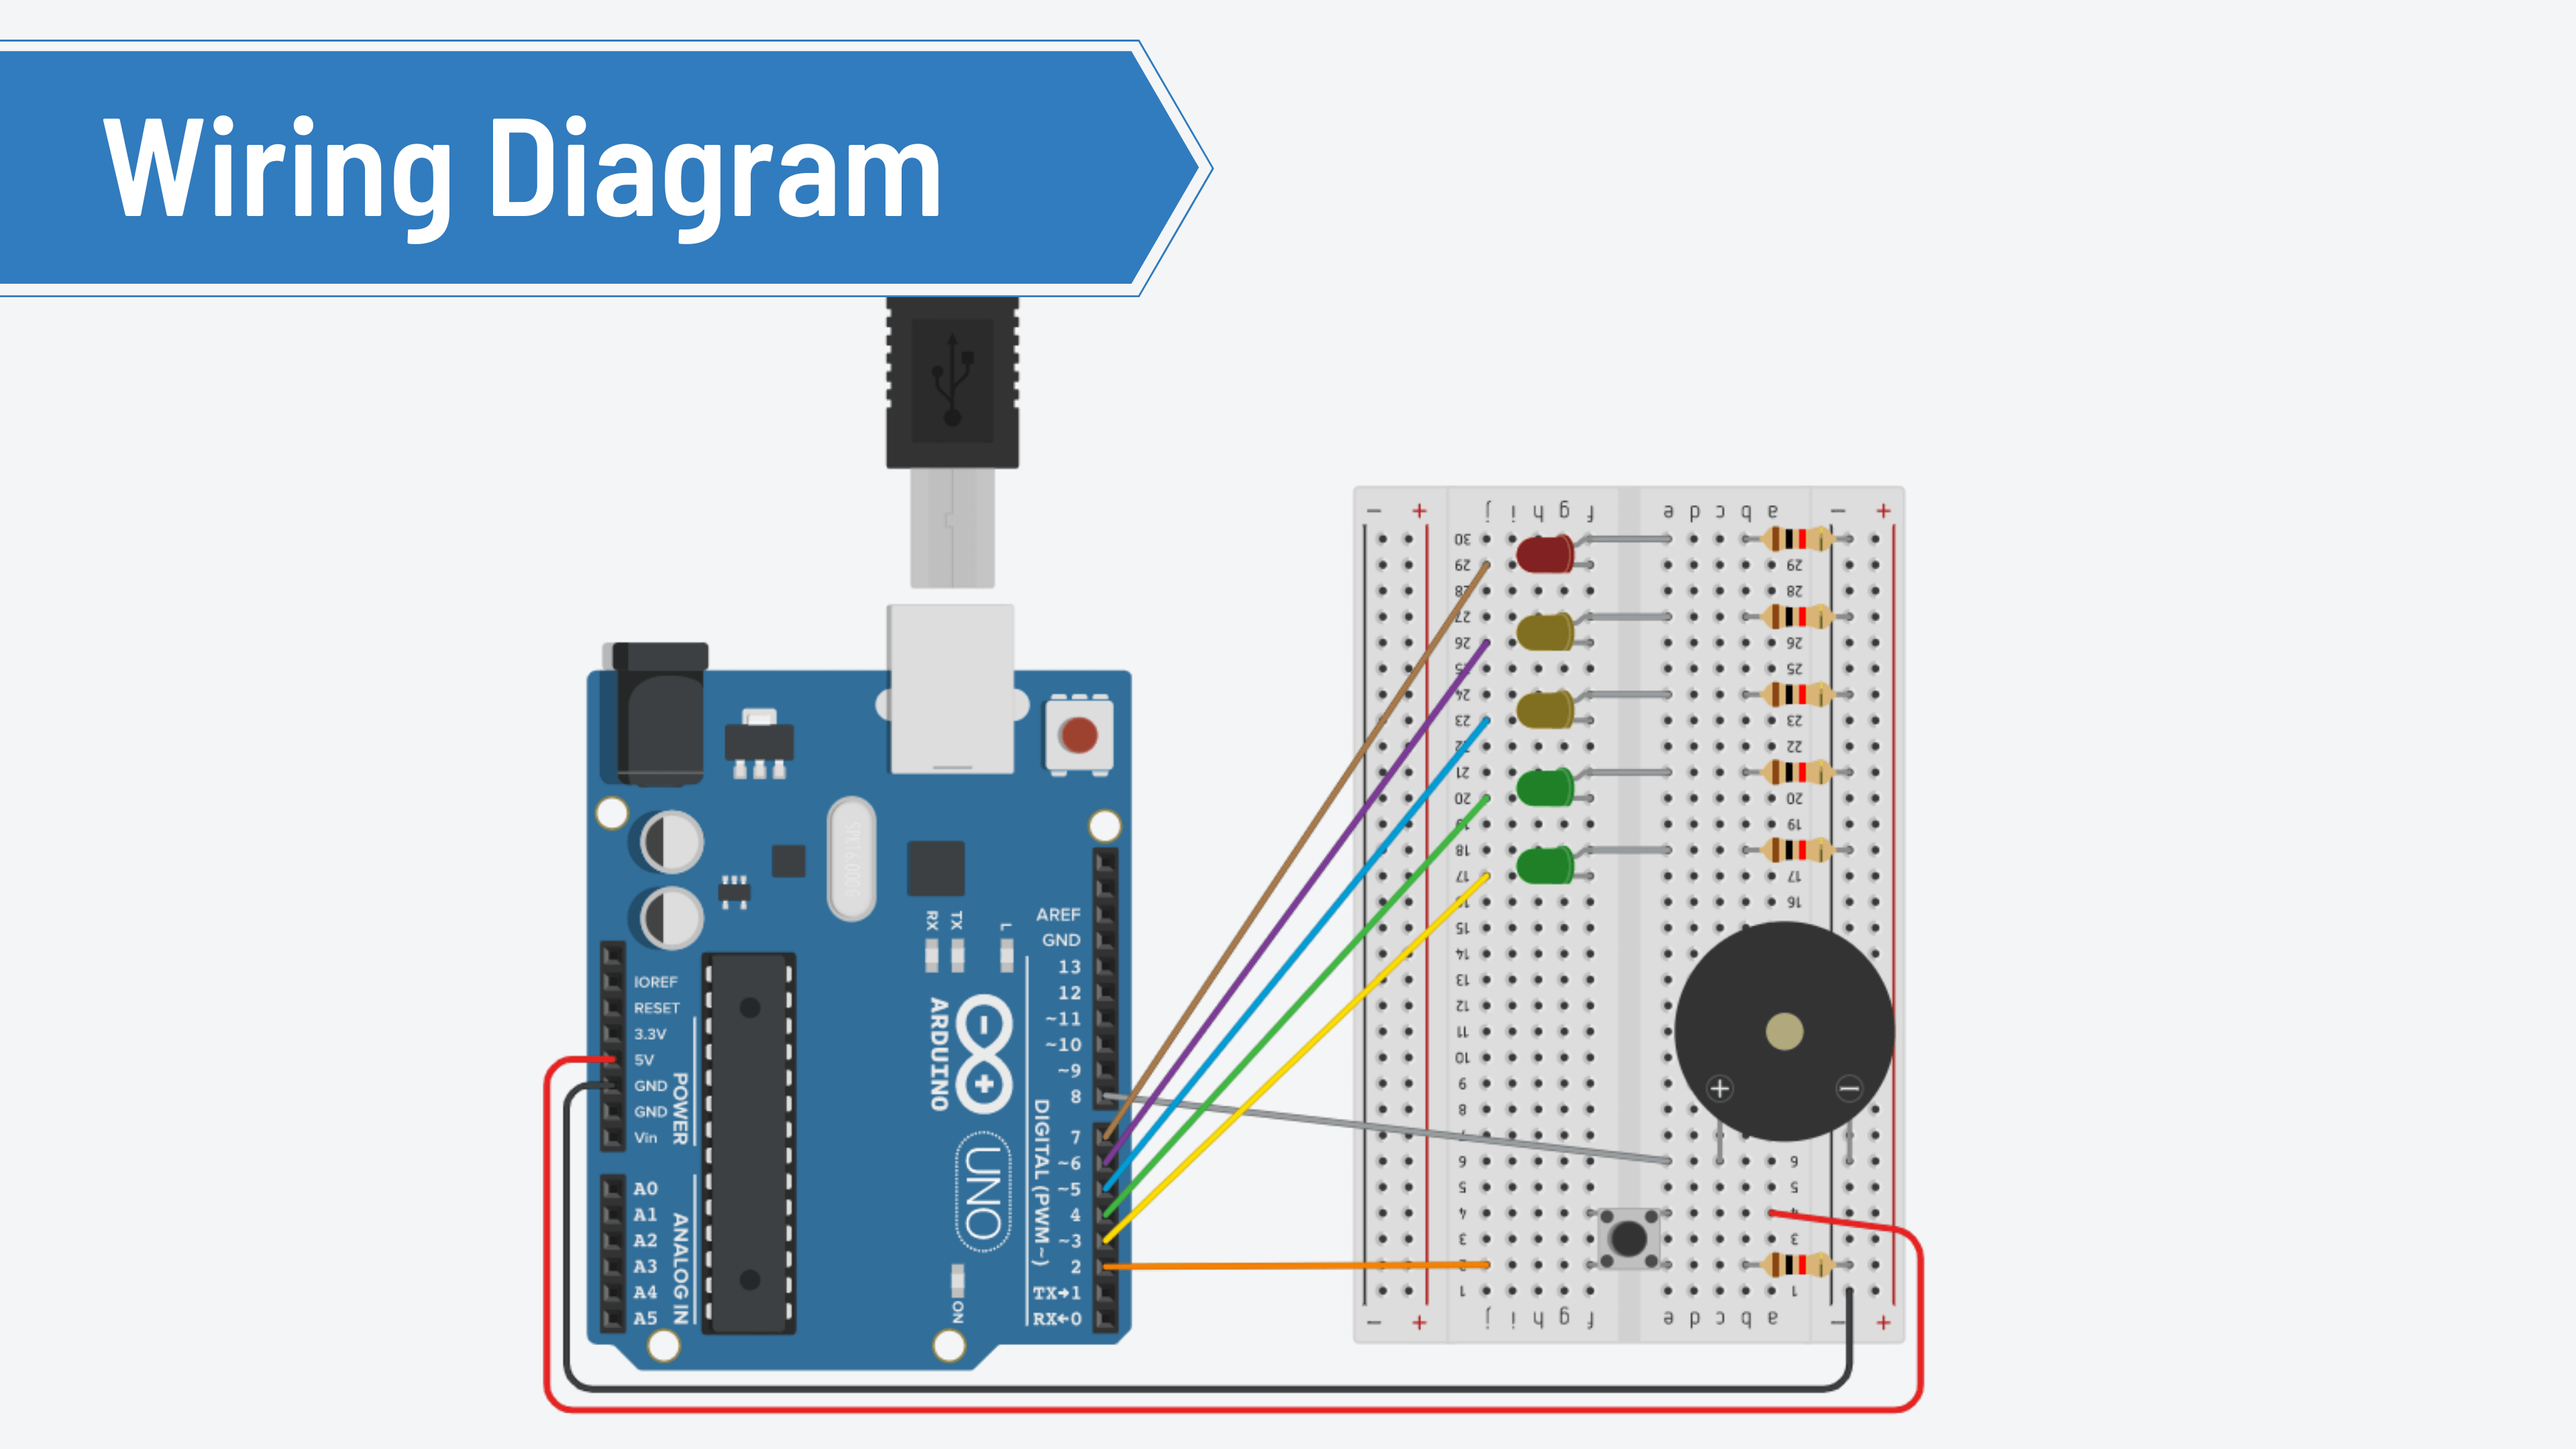
Wiring Diagram
Here is a Complete Wiring Diagram along with Instructions for this Project
Program / Code
Code is Explained in the Comments of the Code
// LED & Buzzer Alarm
// Code By ---- AceLabs ----

int Red = 3; // The Red LED Pin
int Yellow = 4; // The Yellow LED Pin
int Green = 5; // The Green LED Pin
int greentwo = 6; // The Blue LED Pin
int redtwo = 7; // The White LED Pin
int Push = 2; // The Push Button Pin
int Buzzer = 8; //The Buzzer Pin
int Value = 0; // A changable value
int Repeat = 0; // A changable value
int Value2 = 0; // A changable value
int count; // Used in the "for" statement
int max; // Used in the "for" statement


void setup()
{
  Serial.begin(9600);
  pinMode(Red, OUTPUT); // Initialize pin mode
  pinMode(Yellow, OUTPUT); // Initialize pin mode
  pinMode(Green, OUTPUT); // Initialize pin mode
  pinMode(greentwo, OUTPUT); // Initialize pin mode
  pinMode(redtwo, OUTPUT); // Initialize pin mode
  pinMode(Push, INPUT); // Initialize pin mode
  pinMode(Buzzer,OUTPUT); // Initialize pin mode
}


void loop()
{
  Value = digitalRead(Push); // Read push button state and assign its value to "Value"
  Serial.println(Value);
  if (Value == HIGH) { // If push button is pressed start this string
    Repeat = 1; // Set "Repeat" value to 1 to start the next string even if push button is released
  }

  if (Repeat == 1) { // When "Repeat" equals 1 start this sring

    delay(2000); // Wait for 2000 millisecond(s)
    digitalWrite(3, HIGH); // Turn on Red LED
    delay(2000); // Wait for 2000 millisecond(s)
    digitalWrite(4, HIGH); // Turn on Yellow LED
    delay(2000); // Wait for 2000 millisecond(s)
    digitalWrite(5, HIGH); // Turn on Green LED
    delay(2000); // Wait for 2000 millisecond(s)
    digitalWrite(6, HIGH); // Turn on second green LED
    delay(2000); // Wait for 2000 millisecond(s)
    digitalWrite(7, HIGH); // Turn on second red LED

    for (count=0;count<5;count++) //Starts the next string and repeats it 5 times
        {
    digitalWrite(Buzzer, HIGH); // Turn on the Buzzer
    delay(500); // Wait for 500ms
    digitalWrite(Buzzer, LOW); // Turn off the Buzzer
    delay(500); // Wait for 500ms
    digitalWrite(3, HIGH); // Turn on Red LED
    digitalWrite(4, HIGH); // Turn on Yellow LED
    digitalWrite(5, HIGH); // Turn on Green LED
    digitalWrite(6, HIGH); // Turn on second green LED
    digitalWrite(7, HIGH); // Turn on second red LED
    digitalWrite(Buzzer, HIGH); // Turn on the Buzzer
    delay(500); // Wait for 500ms
    digitalWrite(Buzzer, LOW); // Turn off the Buzzer
    delay(500); // Wait for 500ms
    digitalWrite(3, LOW); // Turn off Red LED
    digitalWrite(4, LOW); // Turn off Yellow LED
    digitalWrite(5, LOW); // Turn off Green LED
    digitalWrite(6, LOW); // Turn off second green LED
    digitalWrite(7, LOW); // Turn off second red LED
    delay(500);// Wait for 500ms

    }}

  Repeat = 0; // Changes "Repeat" value to 0 until the push button is pressed again


}
Thank you so much for going through our tutorial, we hope it was easy to follow and you enjoyed it, please share your feedback and pictures of the project (if you have made it) in the comments below .!


